Starlink’s standard kit — dish, router, kickstand, and 75-foot cable — is designed to get you online quickly. But the accessories and mounting hardware you add to that base kit can make the difference between an installation that performs brilliantly for a decade and one that causes ongoing frustration. Rural properties have specific mounting, cable management, and networking needs that the standard kit doesn’t fully address. This comprehensive guide covers the best Starlink accessories and mounting solutions available in 2026, organized by category and use case, with specific recommendations for rural homeowners, farmers, RV users, and boaters.
In This Guide
- Official Starlink Accessories
- Best Mounting Solutions for Rural Homes
- Ground Pole and Mast Systems
- Roof and Chimney Mount Options
- Cable Management Accessories
- Router Upgrades: Third-Party Options
- Power Accessories for Off-Grid and Rural Use
- RV and Mobile Mounting Accessories
- Weather Protection and Dome Covers
- What’s Worth Buying vs What to Skip
- FAQs
Official Starlink Accessories Worth Buying
Starlink sells accessories directly through its website and app. Not all are worth the price — here’s an honest evaluation of each:
| Accessory | Price | Worth It? | Notes |
|---|---|---|---|
| Ethernet Adapter (Gen 3) | ~$25 | ✅ Essential | Required for wired connections and third-party router bypass mode |
| 150-ft Cable Extension | ~$30 | ✅ If needed | Only needed if dish is more than 75 feet from router location |
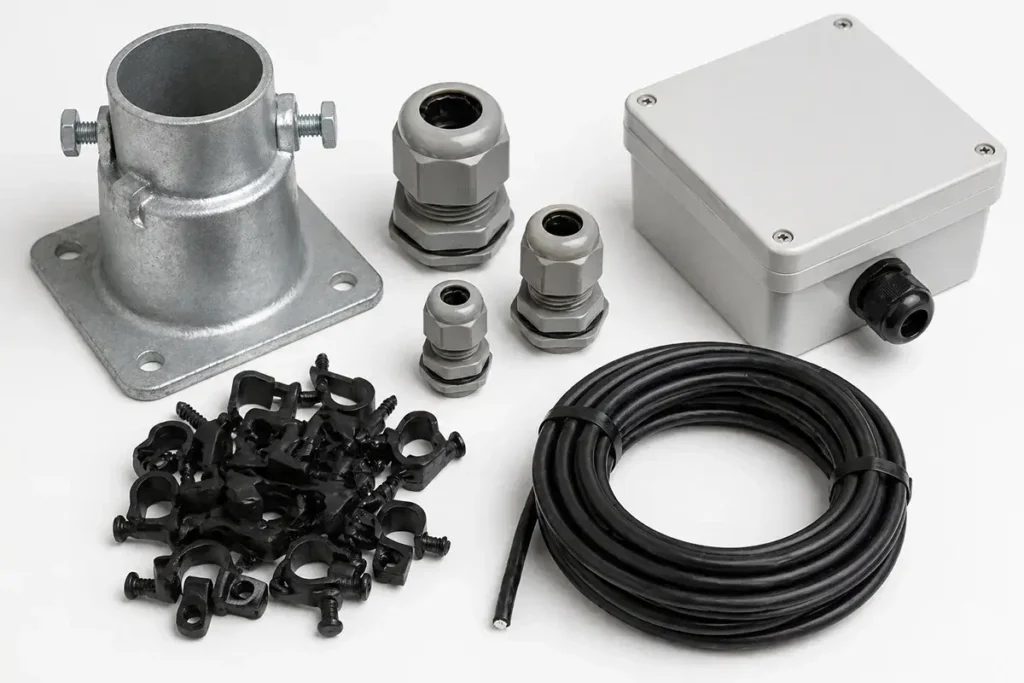
| Pipe Adapter | ~$25 | ✅ Yes | Allows mounting on standard 2-inch pipe — essential for ground pole mounts |
| Starlink Mesh Node | ~$130 | ⚠️ Maybe | Good for expanding Wi-Fi if staying in Starlink router ecosystem; third-party mesh often better value |
| Starlink Mini ($249) | $249 + $30/mo | ⚠️ For travel only | Compact dish for travel, not a primary replacement for full dish |
| Roof Mount Kit | ~$60 | ⚠️ OK option | Decent quality but aftermarket options often better for rural durability requirements |
The single most important accessory purchase for any Starlink rural installation is the Ethernet Adapter ($25). Without it, you cannot connect wired devices to the network or use a third-party router in Bypass Mode. Order it with your Starlink kit — shipping separately adds delay to your setup.
Best Mounting Solutions for Rural Homes
The mounting solution determines the long-term performance, stability, and maintenance requirements of your Starlink installation. Rural properties need hardware engineered for outdoor exposure, wind loads, and in many cases, snow and ice accumulation. Consumer-grade mounting hardware designed for suburban rooftops is often inadequate for rural conditions.
Key mounting requirements for rural properties:
- Hot-dip galvanized or powder-coated steel construction — not aluminum in high-wind areas
- Rated for minimum 90 mph wind load — rural properties can be significantly more exposed than suburban settings
- Secure anchoring appropriate for your soil type and structure
- Cable management provisions that allow the Starlink cable to route without sharp bends or unsupported spans
- Compatible with Starlink’s standard pipe adapter (2-inch OD pipe is the universal mounting standard)
Ground Pole and Mast Systems
Best overall for most rural properties: DIY galvanized steel pipe ground mount
The most durable, most adjustable, and often most cost-effective rural Starlink mount is a DIY galvanized steel pipe ground mount. Materials cost $50–$150 and the result is stronger and more flexible in placement than any pre-packaged mount solution. The recipe:
- Purchase 2-inch schedule 40 hot-dip galvanized steel pipe in your desired length (6, 8, 10, 12, or 16 feet) from a local agricultural or construction supply store
- Purchase a concrete tube form (8-inch diameter, 24–36 inches deep) and quick-set concrete
- Dig or drill a hole at least 24 inches deep (36 inches in freeze-thaw climates), insert tube form, pour concrete with the pipe centered, and brace until set
- Attach Starlink’s pipe adapter to the top of the pipe — it fits 2-inch OD perfectly
- Mount the dish to the adapter and run your cable neatly down the pipe to the ground
Result: an installation rated for hurricane-force winds if properly anchored, at a total cost of $50–$150, that positions the dish exactly where your sky scan indicated maximum sky clearance.
Best packaged ground mount for non-DIY installs: TechnoRV Starlink Ground Mount (~$140)
TechnoRV makes one of the more popular pre-packaged Starlink ground mounts. It includes the mounting base, a 10-foot steel pipe, and a concrete anchor kit. Solid construction, clear instructions, and a good option for rural homeowners who want a complete packaged solution rather than sourcing materials individually.
Best tall mast for tree-heavy properties: StarMount 30-Foot Telescoping Mast (~$250–$350)
For rural properties with significant tree obstruction, a tall mast is often the only solution. StarMount and several other suppliers make purpose-built telescoping masts designed for Starlink that extend to 20–30 feet and include guy-wire anchoring systems for stability at height. At 30 feet, most tree canopy obstruction can be cleared on all but the most densely wooded properties.
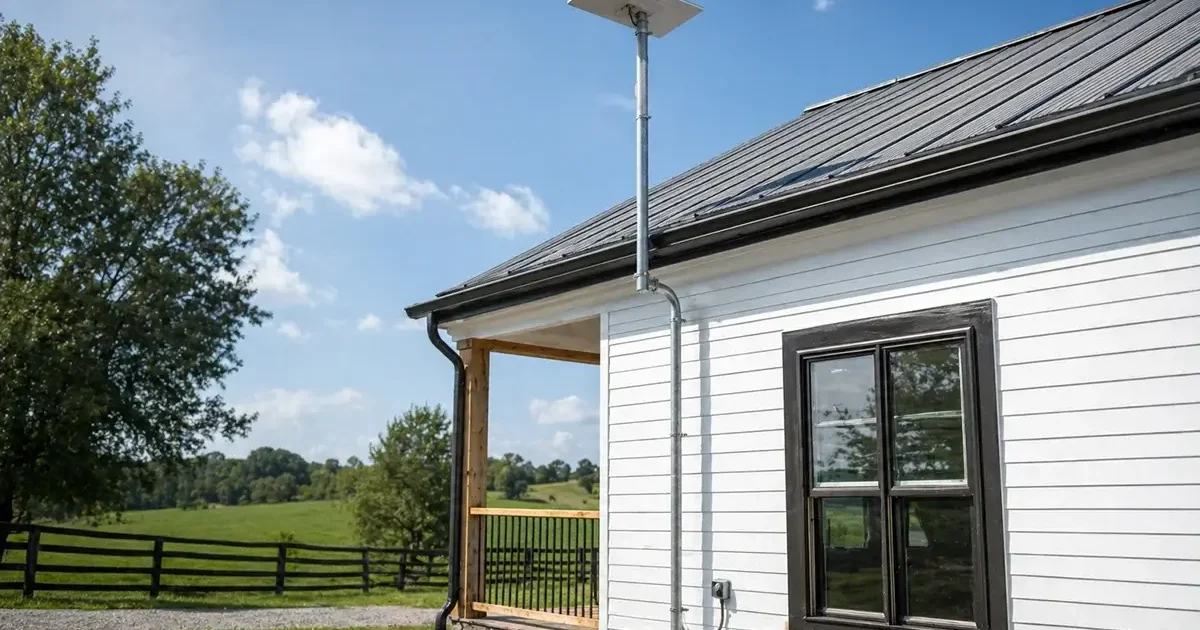
Roof and Chimney Mount Options
Winegard ConnecT RV/Roof Mount (~$80): Winegard is a trusted antenna manufacturer and their Starlink-compatible roof mount is well-reviewed for standard residential roof installations. Includes flashing to prevent water intrusion at the mounting point — a critical feature for any roof penetration in rural climates with heavy rain or snow.
Chimney Mount Kit (~$40–$80 aftermarket): Chimney straps with a 2-inch pipe adapter provide a no-roof-penetration mounting option for homes with a chimney in a favorable sky position. Quality varies significantly between vendors — choose kits with heavy-gauge steel straps (minimum 3/16-inch thickness) for durability against wind loads.
J-Pole fascia mount (~$20–$40): The simplest roof installation — clamps to your home’s fascia board with a short J-shaped pipe extending upward. Lowest cost and easiest installation, but provides less dish elevation than roof peak or chimney mounts. Adequate for properties where the eave clearance is sufficient for the dish’s sky requirement.
Cable Management Accessories
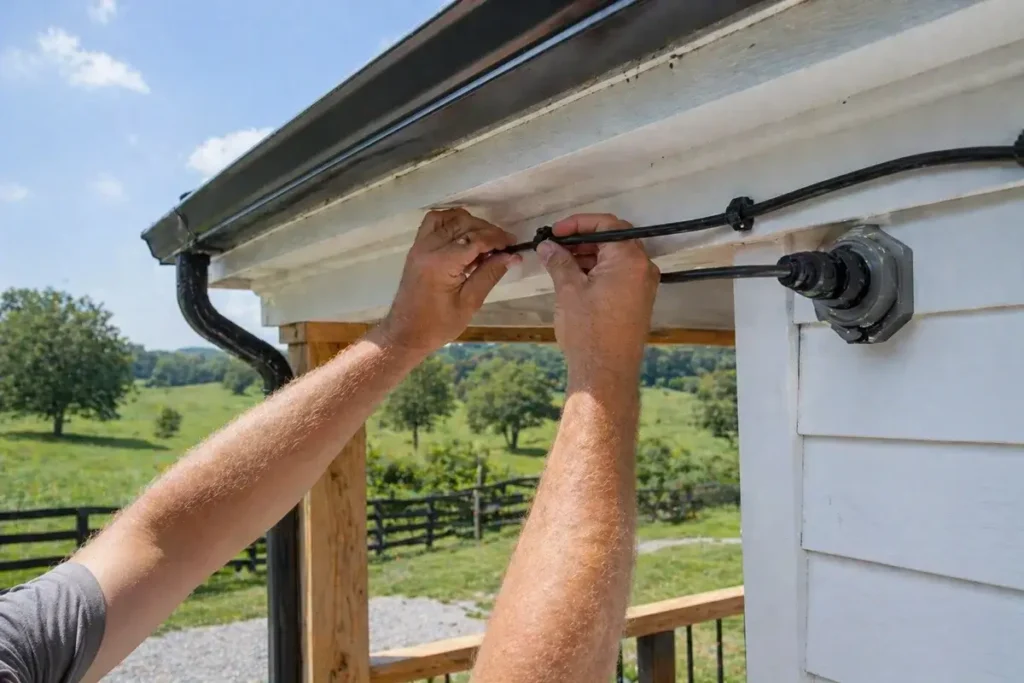
UV-resistant cable clips (pack of 50, ~$10): Essential for securing the Starlink cable along its route from dish to router entry point. Use every 18–24 inches on horizontal runs, every 12 inches on vertical runs. Standard plastic cable clips become brittle and break in 2–3 years of UV exposure — pay the small premium for UV-stabilized outdoor-rated clips.
Outdoor cable conduit/raceway (~$15–$30 per section): For the portion of the cable running along an exterior wall that is visible and exposed to physical damage, UV, and pests, a cable raceway provides protection and a clean professional appearance. PVC raceways in standard white or gray are paintable to match your home’s exterior.
Cable entry gland (~$8–$15): A weatherproof rubber gland that seals around the cable where it passes through an exterior wall or roof penetration. Prevents water intrusion, air infiltration, and insect or rodent entry through the cable hole. This is a required component of any permanent Starlink installation — never leave a raw drilled hole around the cable unsealed.
Drip loop former (~$5): A simple clip that forms the cable into a downward loop before it enters the building, ensuring any water running down the cable drips off before reaching the entry point rather than following the cable inside.
Best Third-Party Routers for Starlink Rural Homes
Replacing the included Starlink router with a third-party mesh system (using Bypass Mode) is the single highest-impact performance upgrade for large rural homes. Top recommendations for rural Starlink users:
Eero Pro 6E 3-pack (~$599): The most popular Starlink router upgrade for rural homes — excellent coverage, straightforward app management, Wi-Fi 6E support, and reliable mesh performance. Works seamlessly with Starlink’s Bypass Mode via the Ethernet Adapter.
GL.iNet Flint 2 (~$89): For rural users who want advanced network features (VPN server, custom DNS, traffic monitoring) at a budget price. Single-unit — not a mesh system — but covers most homes up to 2,500 sq ft well. Popular with technically minded rural users who want granular network control.
Peplink Surf SOHO (~$200): The best option for rural users who want Starlink as primary with a cellular backup that automatically activates during Starlink outages. Dual-WAN capability with automatic failover — the most practical business-continuity router for rural properties where internet downtime has real consequences.
Starlink Accessories Specifically for Farms
Farm Starlink installations have unique requirements compared to residential homes — larger distances between buildings, harsher physical environments, and the need to extend network coverage across agricultural property. Accessories specifically valuable for farm applications:
Multiple pipe adapter kits for satellite dish relocations: Working farms often need to temporarily relocate the Starlink dish during activities like grain bin filling, machinery movements, or building construction. Having additional pipe adapters allows rapid dish relocation to a secondary prepared mount location without disassembling the permanent install.
Weatherproof Ethernet enclosures ($15–$40): For Ethernet cable connections running to outbuildings, weatherproof junction boxes with strain relief fittings protect the connector points from water ingress and physical damage. Essential for any outdoor Ethernet connection exposed to agricultural environments with dust, moisture, chemical spray, and physical contact risks.
PoE (Power over Ethernet) switches for outbuilding access points ($50–$150): To extend network coverage to barns, shops, and storage buildings via Ethernet cable, a PoE switch powers both the network cable and the access point at the remote building from a single Cat6 run — eliminating the need for separate power outlet installation at each remote access point location.
Winter Accessories for Harsh Climate Starlink Installations
Rural properties in northern states, mountain West, and Great Plains face winter conditions that can challenge standard Starlink installations. Accessories that improve cold-weather performance:
Heated cable management clips ($20–$40 for heat trace tape): In climates with prolonged below-zero temperatures, the Starlink proprietary cable can become stiff and may develop micro-cracks over years of extreme temperature cycling. Applying a short section of low-wattage heat trace tape at the most exposed cable runs — particularly where the cable transitions from the dish to a vertical drop — prevents brittleness damage at the most vulnerable points.
Tilt mount adapter for steep snow-shedding angle: Standard Starlink dish mounting positions the dish at a near-vertical orientation in most installations. In climates with heavy wet snow, tilting the dish an additional 15–20 degrees from vertical encourages snow to slide off before it accumulates beyond what the heater can melt. Third-party tilt adapters compatible with Starlink’s standard pipe mounting are available for $20–$50 from aftermarket suppliers.
Extended-temperature router enclosures: The Starlink router is rated for 0°C to 40°C ambient temperature. In uninsulated outbuildings where the router may be installed, winter temperatures below this threshold can cause the router to malfunction. An insulated enclosure with a small heat source (low-wattage heat tape or a ceramic space heater on a thermostat) maintains the router in its operating temperature range without heating the entire building.
What’s Worth Buying vs What to Skip
Worth buying: Ethernet Adapter, proper ground mount hardware, UV-resistant cable clips, cable entry gland, drip loop former, quality third-party router if your home is large, UPS for router and dish power supply.
Skip or defer: Dome covers (the built-in heater handles most snow — domes can reduce thermal dissipation and ironically cause overheating in summer), aftermarket “signal boosters” that claim to improve Starlink speed (these are scams — the Starlink dish communicates directly with satellites via its proprietary phased array, and no external RF device can improve this), extended warranty offers from third-party sellers, and “Starlink acceleration” software products.
Frequently Asked Questions
Does Starlink work with a third-party router?
Yes. Enable Bypass Mode in the Starlink app after connecting the Ethernet Adapter and your third-party router. The router connects via standard Ethernet to the Ethernet Adapter’s output port. See our complete Starlink installation guide for step-by-step Bypass Mode setup instructions.
What is the best Starlink mount for a property with heavy tree cover?
A tall mast — 20 to 30 feet — anchored in concrete is the solution for properties where tree cover prevents sky clearance at normal installation heights. StarMount’s telescoping mast systems are purpose-built for this application. Before investing in a tall mast, use the Starlink app’s obstruction scanner to confirm that sufficient sky clearance is achievable at height — in some very heavily wooded properties, even a 30-foot mast cannot clear enough obstruction for reliable service.
Can I use a longer cable than Starlink’s 150-foot maximum?
The Starlink proprietary cable’s maximum supported length is 150 feet (the 75-foot included cable plus one 75-foot extension). Beyond 150 feet, signal quality degrades. However, the power and data signal can be converted to standard Ethernet at the dish end using a Starlink Ethernet Adapter and then run indefinitely via outdoor-rated Cat6 cable to a router location — with the router providing power to the dish via the Ethernet Adapter and a separate power injection solution. This approach requires more complex wiring but enables router placement far from the dish location, which is useful for large rural properties with long distances between the optimal dish site and the home interior. According to Starlink’s official support documentation, the standard cable is the recommended approach for all standard installations.


Leave a Reply