Installing Starlink at a rural home or property is one of the most rewarding DIY projects a rural resident can undertake — and it is far more accessible than most people expect. SpaceX designed the entire Starlink system for self-installation, and the majority of customers successfully complete the process in two to four hours with no professional help and minimal technical background. That said, getting the installation right the first time — choosing the optimal dish location, mounting it securely, routing the cable properly, and configuring the network — makes the difference between a Starlink that performs brilliantly for years and one that causes ongoing frustration. This complete 2026 Starlink installation guide covers every step in detail, from the moment your kit arrives on the doorstep to the moment you run your first speed test.
In This Guide
- What Comes in the Starlink Kit
- Step 1: Obstruction Check Before You Install Anything
- Step 2: Choose the Right Mount for Your Property
- Step 3: Running the Cable
- Step 4: Connecting and Powering On
- Step 5: Setting Up Your Network
- Step 6: Optimizing Performance After Install
- Setting Up a Third-Party Router in Bypass Mode
- Common Installation Mistakes and How to Avoid Them
- Installation Troubleshooting
- Frequently Asked Questions
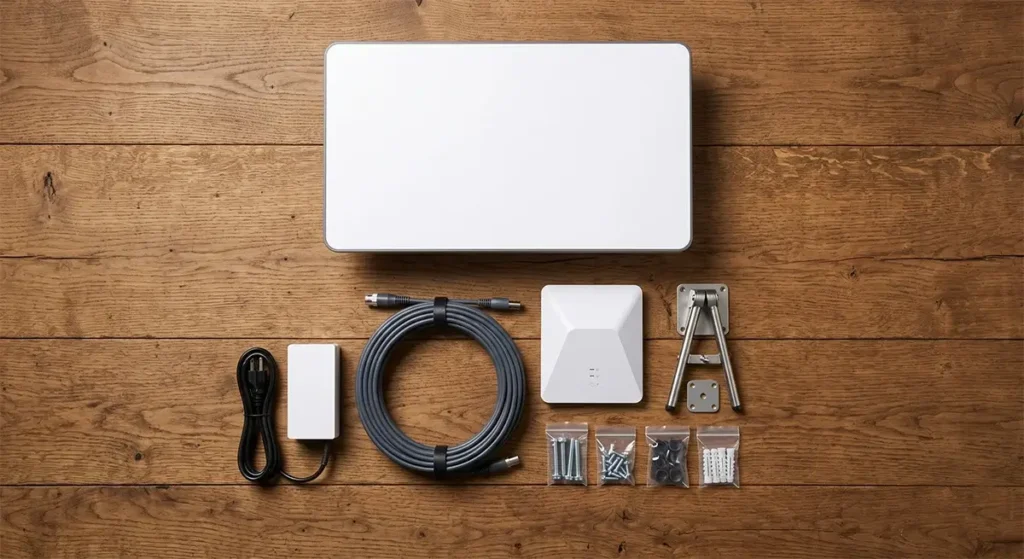
What Comes in the Starlink Gen 3 Kit
Every Starlink residential order ships with the same core kit. Knowing exactly what’s included — and what you’ll need to purchase separately — prevents surprises on installation day:
Included in every kit:
- Starlink Gen 3 flat panel dish — a compact rectangular phased-array antenna approximately 12 inches wide by 21 inches tall, weighing about 4.2 lbs. The dish is motorized and self-orienting; it automatically finds and tracks satellites once powered on.
- Kickstand ground mount — a simple folding metal stake mount designed to hold the dish upright on flat ground. Adequate for temporary placement or testing, but not a permanent installation solution for most rural properties.
- 75-foot proprietary Starlink cable — a single cable that carries both power (PoE) and data from the dish to the router. This is a proprietary connector on the dish end — it cannot be replaced with standard Ethernet cable. Handle it gently and never kink it.
- Starlink Wi-Fi router (Gen 3) — a compact, attractive router that manages both the PoE power delivery to the dish and the home Wi-Fi network. Provides adequate Wi-Fi 6 coverage for homes up to about 2,500 sq ft.
- Power cable — standard country-specific power cable for the router.
NOT included — commonly needed for rural installations:
- Starlink Ethernet Adapter (~$25) — required if you want to connect a third-party router or access a wired Ethernet port on the Gen 3 system. Essential for most serious rural home setups.
- Pipe adapter or roof/wall mount kit ($25–$150) — the included kickstand is not suitable for permanent roof or pole mounting. Most rural homeowners need an aftermarket or Starlink-branded mount accessory.
- Cable entry gland or weatherproof feed-through (~$10) — for routing the Starlink cable through a wall or roof without creating a gap that allows water, air, or pests to enter.
- 150-foot cable extension ($30) — if your dish installation location is more than 75 feet of cable run from your router location, you need Starlink’s official extension cable.
Step 1: Obstruction Check — Do This Before Installing Anything
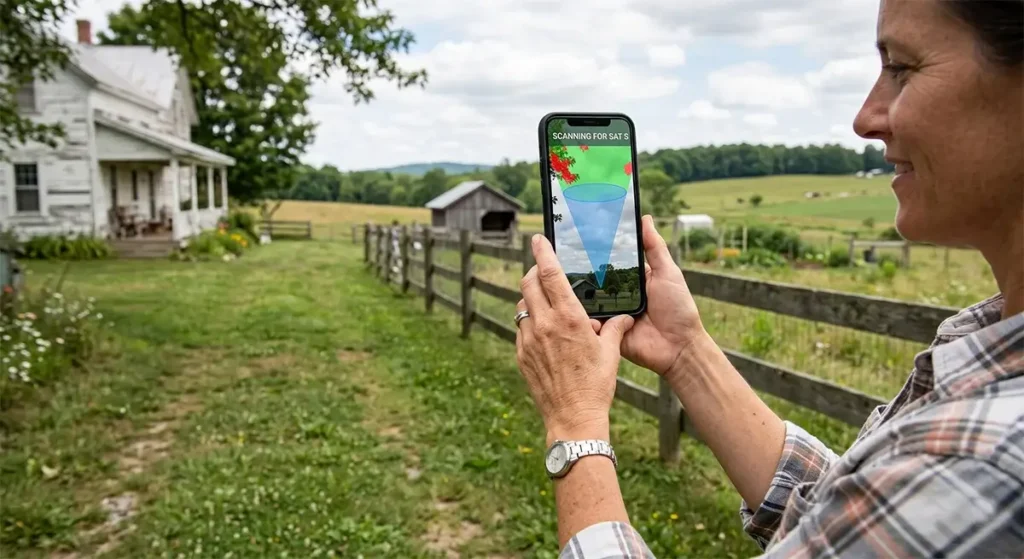
The single most important step in a Starlink installation is finding the right location for the dish. Starlink requires an unobstructed view of the sky in a roughly 100-degree cone angled toward the north (for US customers). Trees, roof eaves, chimneys, dormer windows, utility poles, and even distant hills can create obstruction events that interrupt your service with brief but annoying disconnections.
Download the free Starlink app (iOS and Android) before your kit even arrives. Navigate to the “Check for Obstructions” feature and use the phone’s augmented reality mode to scan the sky from your intended installation location. Walk around your property with the phone, scanning from different candidate locations — your roof peak, a chimney area, a proposed pole location in the yard, the south face of your home, the north side of a detached garage.
The app visualizes the satellite coverage cone and highlights any obstructions in red. An ideal installation site shows zero or near-zero red — meaning the entire relevant sky sector is clear. A site with more than 5–10% obstruction (shown as a percentage in the app) will cause enough disconnection events to be annoying for video calls and real-time applications.
Rural-specific obstruction guidance:
- Trees are the most common rural obstruction problem. Even a single branch that intermittently sways into the satellite path during wind will cause brief but repeated disconnections. A mast that clears the canopy by 5–10 feet is almost always worth the extra mounting effort.
- A roof peak installation often has better sky clearance than a chimney or dormer mount because it gets the dish above the roofline on all sides. Use the app to compare candidate locations on the roof before committing to a mounting spot.
- If you’re in hilly or mountain terrain, northern-facing ridges can obstruct the satellite path even at distances of half a mile. Check the app from the specific spots where you intend to mount, not just from your driveway or yard.
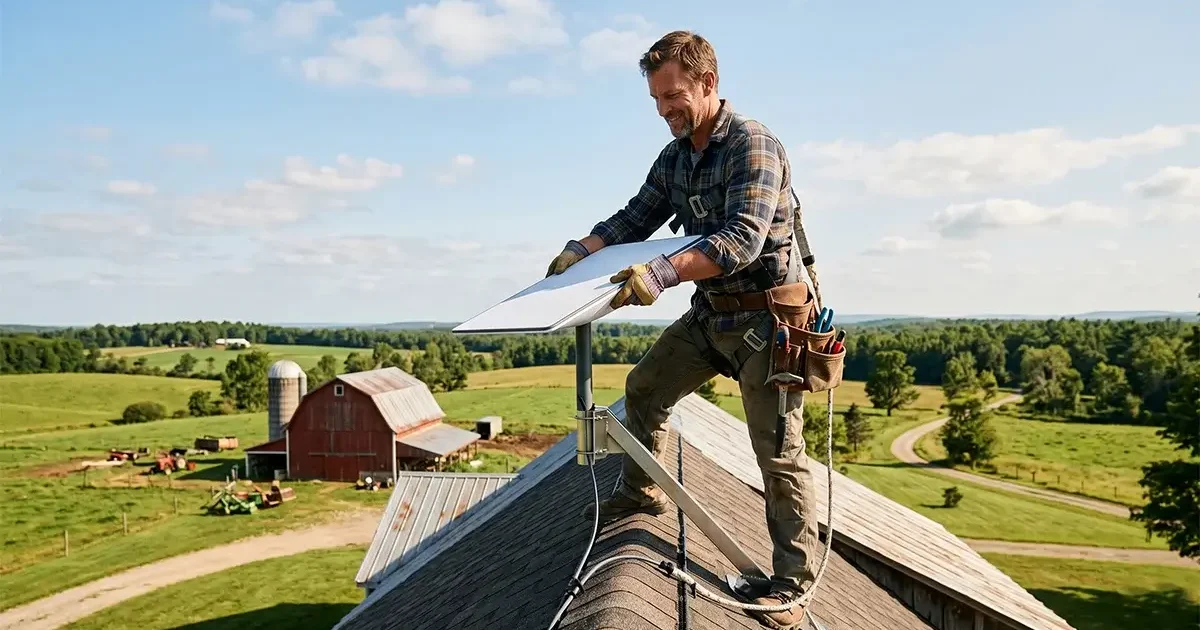
Step 2: Choose the Right Mount for Your Rural Property
The mounting solution is the most important hardware decision in a rural Starlink installation. The wrong mount creates a years-long frustration; the right one enables a set-and-forget installation that requires no maintenance for the life of the hardware.
| Mount Type | Best For | Pros | Cons | Approximate Cost |
|---|---|---|---|---|
| Roof Peak Mount | Standard homes with accessible roof peaks | High elevation, best sky view, secure in wind | Requires roof penetration, harder to access | $30–$100 |
| Chimney Mount | Homes with chimney near clear northern sky | No roof penetration needed, very secure | Limited by chimney position, may still have obstructions | $40–$80 |
| J-Pole Fascia Mount | Homes where eave-line clearance is sufficient | Easy installation, no drilling into roof deck | Lower elevation, eave may create partial obstruction | $20–$50 |
| Ground Pole (Concrete Base) | Open properties without tall trees, farms | Flexible placement, no roof work, very stable | Requires concrete, visible from yard | $50–$200 |
| Tall Free-Standing Mast (10–30 ft) | Properties with tree cover needing clearance | Clears tree canopy, maximizes sky view | More complex installation, requires guying or concrete | $100–$400 |
| Wall Mount | Buildings with a clear wall face toward north sky | Simple installation, cable kept short | Lower elevation than roof, limited sky view angle | $25–$60 |
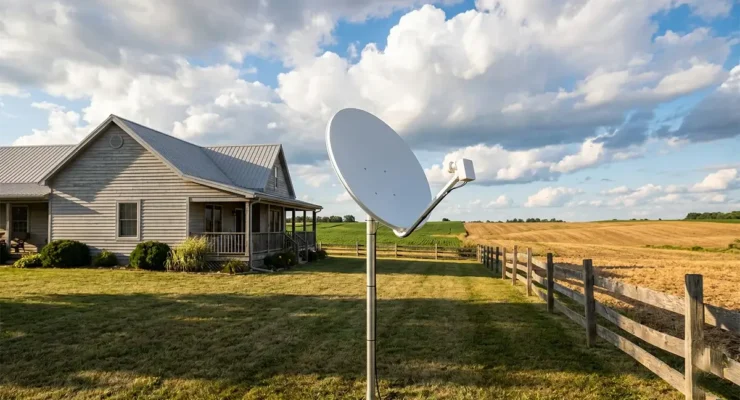
For most rural properties, we recommend a ground-set steel pipe mount with concrete base as the most durable and flexible long-term solution. Use 2-inch schedule 40 galvanized steel pipe at whatever height clears local obstructions (typically 6–15 feet). Set the pipe in a concrete tube form (available at any hardware store) sunk 24–36 inches into the ground. Starlink’s pipe adapter fits directly onto the 2-inch pipe. This installation requires no roof penetrations, is extremely secure in high winds, and can be placed exactly where the sky view is best rather than being limited to where your roof geometry allows.
For comprehensive mounting hardware options, aftermarket suppliers like StarMount, TechnoRV, and Winegard offer purpose-built Starlink mounting kits with all necessary hardware included.
Step 3: Running the Starlink Cable
The 75-foot proprietary Starlink cable is the most mishandled part of most installations. Follow these guidelines to protect it:
Cable handling rules:
- Never kink, sharply bend, or put weight on the cable — the minimum bend radius is approximately 1 inch. A single sharp kink can damage the internal conductors permanently.
- Use cable clips (outdoor-rated UV-resistant clips) to secure the cable neatly along its route — about every 18–24 inches along horizontal runs, every 12 inches on vertical runs.
- Where the cable transitions from outdoors to indoors, use a weatherproof cable entry gland, a purpose-built cable entry plate, or a drip loop that allows water to run off before the entry point.
- If routing under eaves or along fascia, use a cable raceway to protect from UV degradation and physical damage.
Entry into the house: The most common entry methods for rural homes are:
- Drilled hole through exterior wall: Use a 3/4-inch drill bit. The Starlink connector head is approximately 19mm diameter and will pass through a 3/4-inch hole. Seal around the cable with outdoor weatherproof caulk after routing.
- Existing cable penetration: If your home already has a coaxial TV cable entry point or a conduit from a previous satellite dish, you may be able to route the Starlink cable through the same conduit after removing the old cable.
- Window or door frame pass-through: Flat cable pass-through pads designed for window and door frames allow you to route the cable without drilling. Slightly less weatherproof but adequate for mild climates and temporary installations.
Extension cable: If your dish location is more than 75 feet of cable run from your planned router location, order Starlink’s official 150-foot extension cable ($30). Third-party extension cables exist but are not officially supported and may cause issues. The maximum total cable run from dish to router is 150 feet (75-foot cable + 75-foot extension, or 150-foot cable alone).
Step 4: Connecting and Powering On
Once the dish is mounted and the cable is routed inside, the connection sequence is straightforward:
- Connect the cable to the router’s dish port. On the Gen 3 router, the proprietary dish connector port is clearly labeled. Push the connector in firmly until it clicks — it is a locking connector that requires a slight push-and-twist to fully seat.
- Connect the power cable to the router. Plug the standard power cable into the router’s power port and into a wall outlet or power strip.
- Power on and wait. The dish will begin its boot sequence. The motor will move the dish through a range of positions as it self-calibrates. This process takes 2–5 minutes. Do not disturb the dish during this process.
- Open the Starlink app. Once the dish completes its boot sequence, it will begin scanning for satellites. Initial satellite acquisition typically takes 5–15 minutes on first boot. The app shows real-time status and will display “Online” when the connection is established.
- Run an obstruction check while live. After the system is online and has run for 15–30 minutes, open the app’s obstruction visualization to see real-time data on whether any obstructions are causing disconnection events. Adjust dish position if the data shows significant obstructions.
Step 5: Setting Up Your Home Network
With the system online, the Starlink app guides you through basic network setup:
- Set your Wi-Fi network name (SSID) and password. In the app, go to Settings → Wi-Fi and configure your preferred network name and a strong password. Use WPA3 security if your devices support it.
- Enable Wi-Fi 6 if available. The Gen 3 router supports Wi-Fi 6. Ensure it is enabled in the router settings for compatible devices.
- Set up the Starlink app for ongoing monitoring. Enable notifications for service outages, and review the Statistics section to monitor real-time and historical performance data.
- Configure guest network if needed. For rural properties where farmhands, visitors, or IoT devices need network access, create a separate guest Wi-Fi network in the app to isolate those devices from your primary network.
Step 6: Optimizing Performance in the First Week
The first week of Starlink operation is the best time to fine-tune your installation before declaring it done:
- Review the obstruction report daily for 3–5 days. The app accumulates obstruction data over time and gives you an increasingly accurate picture of which obstacles are affecting performance. Even small improvements in dish position discovered during this period pay dividends for years.
- Run speed tests at different times of day. Use Speedtest.net in the early morning, midday, and evening to understand your cell’s congestion pattern. Morning speeds represent your connection’s full capacity; evening speeds reflect peak-hour network load in your area.
- Test wired vs. wireless performance. If you have the Ethernet adapter, test speeds via a wired connection directly to the router. Compare with Wi-Fi speeds from the same room. A significant gap suggests Wi-Fi configuration improvement is needed.
- Monitor data usage. The app tracks your monthly data consumption against the 1 TB priority data threshold. Understanding your household’s usage pattern in the first month helps you decide whether the Standard plan is sufficient or if Priority makes sense.
Setting Up a Third-Party Router in Bypass Mode
For rural homes larger than 2,500 sq ft, or for users who want more advanced network features than the Starlink router provides, connecting a third-party mesh Wi-Fi system or router is highly recommended. This requires the Starlink Ethernet Adapter (~$25) and enabling Bypass Mode in the app:
- Purchase and install the Starlink Ethernet Adapter between the dish cable and the router’s dish port.
- Connect your third-party router’s WAN port to the Ethernet Adapter’s output port via a standard Cat5e/Cat6 cable.
- In the Starlink app, go to Settings → Advanced → Bypass Mode and enable it.
- Power cycle the dish and your third-party router. The third-party router will receive a public IP address from Starlink and take over network management.
- Configure your third-party router’s Wi-Fi networks, QoS, and any advanced features through its own management interface.
Note: Enabling Bypass Mode disables the Starlink router’s ability to serve as a network manager. The Starlink app can still show dish performance statistics while in Bypass Mode by connecting to the local statistics endpoint.
Common Rural Starlink Installation Mistakes
- Installing too close to trees. The most common mistake is underestimating how much nearby trees will affect performance. Trees that look clear from the ground may intrude significantly into the satellite cone when the dish is mounted at roof height. Always use the app scanner from the exact intended installation height before drilling any holes.
- Using the kickstand mount permanently. The included kickstand is a temporary/testing mount. It is not rated for permanent outdoor installation, high winds, or snow loads. Replace it with a secure permanent mount before considering the installation complete.
- Kinking the proprietary cable. Kinks in the Starlink cable are permanent damage. Route the cable carefully, especially at corners and entry points. Use gentle sweeping curves rather than sharp bends.
- Placing the router in a cabinet or closet. The Starlink router generates heat during operation and needs ventilation. Enclosing it in a cabinet or tight space causes thermal throttling and reduces performance. Leave at least 6 inches of clearance on all sides.
- Not sealing the cable entry point. Rural homes are particularly vulnerable to pest entry through gaps. Any hole drilled for the Starlink cable must be fully sealed with outdoor caulk after the cable is routed. A 3/4-inch hole is large enough for mice to enter if not sealed.
- Not ordering the Ethernet adapter early enough. If you plan to use a third-party router or need a wired connection, order the Ethernet adapter at the same time as your Starlink kit. It ships separately and not having it delays your ability to set up a fully optimized network.
Installation Troubleshooting
Dish won’t go online after 20 minutes
Check the cable connection at the router — the proprietary connector must be fully seated (pushed and twisted to lock). Check the Starlink app for error messages. Verify the dish has power (the router’s LED should be lit). Reboot the router by unplugging and replugging the power cable. If the dish still won’t connect after a full reboot cycle, check the Starlink service status page through the app for any regional outages.
App shows high obstruction percentage
Move the dish to a higher elevation or a location with better northern sky clearance. Even moving the dish 10–20 feet horizontally can dramatically change the obstruction profile if trees are the issue. If you’re on a roof, try the peak instead of a slope. If trees are the problem, a taller mast is the long-term solution.
Speeds are much lower than expected
Run the speed test at different times of day. If morning speeds are good but evening speeds are poor, network congestion in your cell is the cause — this is a network-side issue, not an installation issue. If speeds are consistently low at all hours, check for obstructions, verify the cable isn’t damaged, and ensure the router is not thermally throttling (feels very hot to the touch).
Wi-Fi works but performance drops away from the router
The Starlink router has limited range for large rural homes. Add a mesh node (Starlink mesh node ~$130, or a third-party mesh system in Bypass Mode) to extend coverage. For the best performance, connect mesh nodes to the router via Ethernet rather than relying on wireless backhaul.
Frequently Asked Questions
Do I need a professional installer for Starlink?
No. Starlink is designed entirely for DIY installation and the vast majority of customers install it without professional help. The process is well-documented in the Starlink app. For complex installations requiring significant mast height, roofing work, or electrical modifications, you may choose to hire a handyman for the physical mounting work while handling the connection and configuration yourself.
How long does Starlink installation take?
Most installations take 2–4 hours from unboxing to a fully configured, running network. Simple installations (ground mount, short cable run, using the included Starlink router) are faster. More complex installations (tall mast, long cable run, third-party router bypass setup) take closer to 4 hours or may span two sessions.
Can I move Starlink to a different location on my property after installation?
Yes. The system can be relocated to any position within your property — or to a completely different address with Portability enabled on your account. Each relocation requires the dish to re-acquire satellites (5–15 minutes) but no additional account configuration changes are needed for moves within the same country.
What tools do I need to install Starlink?
For a basic installation: a drill with 3/4-inch bit (for wall penetration), a screwdriver set, cable clips, outdoor caulk, and a ladder appropriate for your roof or mounting height. For a ground pole installation, you also need post hole digger or an auger, concrete tube form, quick-set concrete, and a level. The Starlink kit itself includes no tools — you supply all installation hardware.
What should I do with the kickstand mount?
Keep the kickstand mount as an emergency backup — it’s useful for temporary deployment at a campsite or secondary location. For permanent installation, replace it with an appropriate permanent mount from the beginning rather than telling yourself you’ll upgrade it later. Temporary mounts that become semi-permanent are a common source of Starlink installation problems including wind damage and poor placement optimization.

Leave a Reply